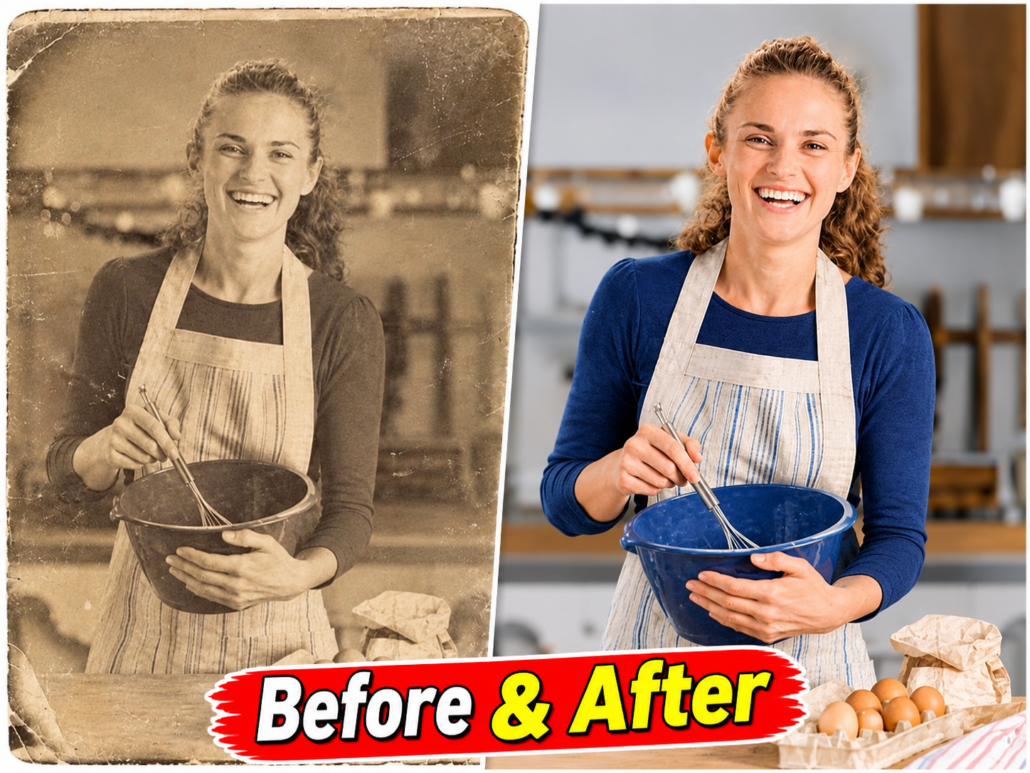
Old family photos fade, crack and blur. The good news is that you no longer need Photoshop skills to bring them back. With the right prompt, ChatGPT and Google Gemini can repair scratches, restore colour and upscale a tiny scan into a sharp, high-resolution image in under a minute.
This guide shares the best generative AI prompts for image restoration and 8K upscaling. Every prompt has a Copy prompt button, and each one is written to fix a specific problem without changing the faces in your photo.
How AI photo restoration works (and its limits)
Generative AI does not “find” lost pixels. It studies the photo and predicts what the missing detail most likely looked like. That is why results can look amazing, and also why a weak prompt can give your grandfather a slightly different nose.
- What AI does well: removing scratches, dust and creases, fixing fading, adding natural colour, sharpening soft edges, and enlarging small scans.
- What to watch: faces, hands, text and small background details. These are the parts AI is most likely to invent.
- About “8K”: AI can output a large, clean image, but the extra detail is reconstructed, not recovered. For family archives, always keep the original scan next to the restored version.
Before you start: 4 tips for better restoration
- Scan, don’t photograph. A flatbed scan at 600 DPI beats a phone photo. If you must use a phone, shoot in daylight, flat, without glare.
- Upload the untouched original. Do not pre-sharpen or filter it. Stacked edits confuse the AI.
- Fix one problem per step for badly damaged photos. Repair damage first, then colour, then upscale.
- Always lock the identity. Every face-photo prompt below starts with an identity-preserving line. Keep it.
The one-shot restoration prompt (start here)
If you try only one prompt, use this. It handles the most common problems of old photos in a single step.
1. Complete one-shot restoration
Use the uploaded photo as the only reference. Preserve every person's identity, facial structure, expression, proportions and the original composition exactly. Do not add, remove or reposition anyone. Restore this old photograph: remove scratches, dust, spots, creases and tears; correct fading and colour cast; recover natural contrast; reduce noise and film grain while keeping fine texture; sharpen soft edges naturally. Keep natural skin texture with no plastic smoothing. Output a clean, photo-realistic result at the highest resolution possible, like a professionally restored print.
Prompts for repairing damage
2. Scratches and dust removal
Use the uploaded photo as the only reference. Preserve every person's identity, facial structure, expression, proportions and the original composition exactly. Do not add, remove or reposition anyone. Remove all scratches, white specks, dust and small spots from this photo. Rebuild the affected areas so they match the surrounding texture. Do not change faces, clothing or the background.
3. Creases, folds and tears
Use the uploaded photo as the only reference. Preserve every person's identity, facial structure, expression, proportions and the original composition exactly. Do not add, remove or reposition anyone. Repair the creases, fold lines and torn edges in this photo. Fill missing areas by matching nearby texture and lighting. Rebuild the missing corner naturally. The final photo should look as if it was never damaged.
4. Water stains and mould spots
Use the uploaded photo as the only reference. Preserve every person's identity, facial structure, expression, proportions and the original composition exactly. Do not add, remove or reposition anyone. Remove the water stains, brown marks and mould spots from this photo. Restore the original tones underneath and keep the paper-photo character subtle and natural.
5. Faded and yellowed photo
Use the uploaded photo as the only reference. Preserve every person's identity, facial structure, expression, proportions and the original composition exactly. Do not add, remove or reposition anyone. This photo has faded and turned yellow. Remove the yellow cast, restore deep blacks and clean whites, and bring back natural contrast and colour balance. Keep the original lighting direction.
Prompts for colourising black-and-white photos
6. Natural colourisation
Use the uploaded photo as the only reference. Preserve every person's identity, facial structure, expression, proportions and the original composition exactly. Do not add, remove or reposition anyone. Colourise this black-and-white photo with realistic, era-appropriate colours. Use natural skin tones, believable clothing colours and a soft, slightly muted palette so it looks like a genuine colour photo from that time, not a modern filter.
7. Colourise a South Asian family photo
Use the uploaded photo as the only reference. Preserve every person's identity, facial structure, expression, proportions and the original composition exactly. Do not add, remove or reposition anyone. Colourise this black-and-white South Asian family photo with natural brown skin tones, realistic traditional clothing colours (such as white, cream, maroon and deep green), and warm, soft daylight. Avoid oversaturated colours. Keep it looking like a real vintage colour print.
8. Wedding photo colourisation
Use the uploaded photo as the only reference. Preserve every person's identity, facial structure, expression, proportions and the original composition exactly. Do not add, remove or reposition anyone. Colourise this old wedding photo with realistic colours: rich bridal red and gold, natural skin tones, warm indoor lighting. Keep jewellery detail sharp and avoid any glow or fantasy effects.
8K upscaling and sharpening prompts
Use these when the photo is in good shape but too small or blurry. They also work for modern low-resolution images, screenshots and product photos.
9. 8K upscale without changing the image
Use the uploaded photo as the only reference. Preserve every person's identity, facial structure, expression, proportions and the original composition exactly. Do not add, remove or reposition anyone. Upscale this image to the highest resolution possible (8K-quality detail). Enhance clarity, edges and fine texture faithfully. Do not change colours, lighting, composition or any facial feature. No artistic reinterpretation, no added objects, no beauty filter.
10. Fix a blurry face
Use the uploaded photo as the only reference. Preserve every person's identity, facial structure, expression, proportions and the original composition exactly. Do not add, remove or reposition anyone. This face is slightly blurry. Sharpen it and recover realistic detail in the eyes, eyebrows, hair and skin texture. Keep the exact same face shape, expression and age. Do not make the person look younger or different.
11. Low-light and noisy photo
Use the uploaded photo as the only reference. Preserve every person's identity, facial structure, expression, proportions and the original composition exactly. Do not add, remove or reposition anyone. Reduce heavy noise and grain in this low-light photo, brighten the shadows gently and recover detail while keeping a natural night-time mood. Avoid a painted or watercolour look.
12. Old video still or screenshot
Use the uploaded photo as the only reference. Preserve every person's identity, facial structure, expression, proportions and the original composition exactly. Do not add, remove or reposition anyone. This is a low-resolution still from an old video. Remove compression blocks and blur, sharpen edges and recover natural detail. Output a clean high-resolution photo with the same framing.
Professional portrait revival prompts
13. DSLR-quality portrait
Use the uploaded photo as the only reference. Preserve every person's identity, facial structure, expression, proportions and the original composition exactly. Do not add, remove or reposition anyone. Restore this old portrait so it looks like it was taken with a modern professional DSLR camera: crisp focus on the eyes, natural colour, clean background, realistic skin texture. Keep the exact facial features and the original pose and clothing.
14. Passport-style photo from an old picture
Use the uploaded photo as the only reference. Preserve every person's identity, facial structure, expression, proportions and the original composition exactly. Do not add, remove or reposition anyone. Restore this old photo and turn it into a clean head-and-shoulders portrait on a plain light grey background, with even lighting and sharp detail. Keep the exact face, hairstyle and expression. Do not change age.
15. Memorial portrait
Use the uploaded photo as the only reference. Preserve every person's identity, facial structure, expression, proportions and the original composition exactly. Do not add, remove or reposition anyone. Restore this photo of a loved one for a memorial frame. Repair all damage, add gentle natural colour, soft even lighting and a simple warm neutral background. Preserve the face exactly as it is, with dignity and realism.
Advanced: structured (JSON-style) restoration prompt
Some newer image models follow structured instructions very precisely. If a normal prompt keeps changing faces, try this format.
16. Structured restoration prompt
{
  "task": "photo_restoration_and_upscale",
  "keep_exactly": ["identity", "facial features", "expression", "pose", "composition", "clothing"],
  "fix": ["scratches", "dust", "creases", "fading", "colour cast", "noise", "blur"],
  "style": "photo-realistic, natural skin texture, professional restored print",
  "avoid": ["beauty filter", "face changes", "added objects", "oversaturation", "painted look"],
  "output": "highest possible resolution"
}
Which tool should you use?
| Tool | Best for | Free option |
|---|---|---|
| ChatGPT (image editing) | One-shot restoration and colourisation with detailed prompts | Yes, with a small daily image limit |
| Google Gemini | Fast edits, good at keeping faces, natural colour | Yes, with daily limits |
| Upscayl (desktop app) | Pure upscaling with no AI “re-imagining” | Free and open source |
| Photoshop / Lightroom AI tools | Careful manual control for professional work | Paid |
Tip: for precious family photos, try the same prompt in two tools and keep the result whose faces look most like the original.
Common problems and quick fixes
| Problem | Fix (reply in the same chat) |
|---|---|
| Face looks like a different person | “Keep the face exactly as in the original. Only remove damage.” |
| Skin looks plastic | “Keep natural skin texture and pores. No smoothing.” |
| Colours look fake or too bright | “Use a muted, era-appropriate palette.” |
| AI added things that were not there | “Do not add any new objects or people. Only restore what exists.” |
| Result is still blurry | Upscale in a second step with prompt 9, or run it through a dedicated upscaler |
Frequently asked questions
Can AI really restore old photos for free?
Yes. ChatGPT and Gemini both allow free image edits with daily limits, and every prompt on this page is free to copy.
Is AI upscaling to 8K real detail?
No. The AI predicts and recreates detail. It looks sharp, but it is a reconstruction, so keep the original for records.
Why does AI change faces during restoration?
The model fills missing detail with its own guesses. Starting with an identity-preserving line and asking for one change at a time reduces this a lot.
Which is the best prompt for heavily damaged photos?
Repair damage first (prompts 2 to 5), then colourise (6 to 8), then upscale (9). Doing it in steps gives far better results than one huge prompt.
Final thoughts
AI restoration is one of the most meaningful uses of generative AI: it brings back faces and moments families thought were lost. Start with the one-shot prompt, fix one thing at a time, and always keep the original scan safe.